How My Experiences Can Help You Efficiently Organize Your Essential Oils for DIY Skincare Products
Being deeply immersed in the world of crafting my own skincare products using essential oils and natural ingredients, I fully understand the excitement and satisfaction that comes with DIY projects. However, I also recognize the frustration that disorganized essential oils and ingredients can bring. Through my own journey, I’ve developed effective strategies for keeping my essential oils well-organized. In this blog post, I’ll be sharing the practical steps I’ve taken to create an orderly system for arranging essential oils and other ingredients. These steps not only expedite the process of finding what you need but also ensure a seamless and enjoyable experience in creating your own skincare products.
- Check Your Inventory: To get started, take a moment to evaluate the space where you conduct your DIY skincare experiments. Begin by taking stock of the essential oils, butters, waxes, oils, extracts, and other ingredients that populate your shelves. By categorizing them based on their types and intended uses, you can eliminate confusion and set the stage for effective organization.
- Check for Rancidity and Declutter: A critical step in this process involves checking the expiration dates of your ingredients (Sometimes you can tell by smelling if a specific oil is rancid). Discard any items that have gone rancid, as using them can compromise the quality of your skincare creations. This step is crucial.
- Strategic Categorization of Essential Oils: For simplicity and easy retrieval, consider categorizing your essential oils according to your preferences and the types of products you frequently create. In my case, I group them by fragrance families such as woodsy, citrusy, floral, spicy, minty, or earthy, etc, it can help you quickly locate what you need.
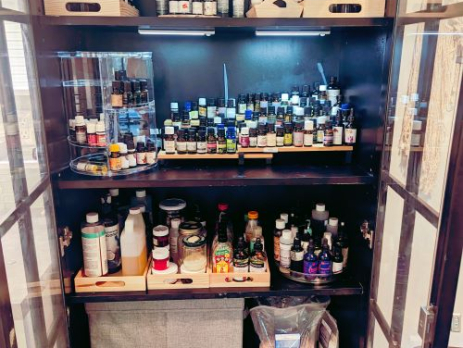
Alternatively, organize them based on the specific products they are used in, creating an intuitive system that aligns with your unique preferences. (for example – specific essential oils used in a specific product can be categorized together – on a tray or shelf or container)- Label them but be ready the new system might change eventually. - Use Organizational Tools and Label them: Efficiency is further improved with the help of practical organizers like step organizers, trays, or lazy susans (check the photo) These tools not only simplify the arrangement of essential oils but also enhance the aesthetics of your DIY workspace. Utilize a lazy susan, for example, to neatly store blends and essential oils from specific brands. This approach ensures quick accessibility, even during time-sensitive moments.
- Placing Your Most-Used Oils within Reach: Simplify your workflow by placing the essential oils you frequently use front and center or where your hand naturally reaches for ingredients. It is good to follow your habits and organize them accordingly. This easy access saves valuable time during the formulation process. For less frequently used oils, consider designating a spot towards the back of your storage area, maintaining an uncluttered visual space.
- Neat Stacking for Multiple Oils: When dealing with multiple oils from the same category or brand, consider stacking them in sequence at a designated specific area in your cabinet solely for stacking purposes. This dedicated space ensures that you can easily view your inventory and access the oils you need without disturbing the organization of the rest of your collection.
- Smart Pipette Handling: For those employing pipettes mostly when working in batches, (using scale and grams instead of drops) a smart approach involves attaching each pipette to its respective essential oil bottle using rubber, with the tip pointing upward. This approach prevents leaks.
- for Night Visibility use LED Lights: If you’re someone who enjoys crafting skincare products in the evenings, consider integrating LED lights into your cabinet. This simple addition provides excellent illumination, making it easy to view your oils and ingredients. (no more using the phone light to look for an ingredient) I’ve personally found this to be an invaluable addition that enhances both the functionality and aesthetics of the workspace. You can find affordable options on platforms such as Amazon or Temu.
- Train yourself to be consistent – After each manufacturing session, make it a habit to promptly return ingredients to their designated spots. This not only ensures that everything is ready for your next creative venture but also maintains the order you’ve painstakingly set up. Additionally, take a moment to clean your workspace
Conclusion: My journey into organizing essential oils and DIY skincare ingredients has shown me that the initial effort is well worth the rewards. An organized collection not only saves time but also fosters a sense of ease and satisfaction when formulating your skincare products. If you’re looking to enhance your DIY skincare experience—much like I have—consider adopting these organizational practices. Here’s to an organized and fulfilling journey of DIY skincare, guided by my experiences and advice.